Showing posts with label Cuisine: Indian. Show all posts

Friday, 1 November 2013

Last Minute Diwali Sweet Treat : Chocolate Burfi

By Our Traveler Guide   Posted at  20:26   Indian Sweets No comments


This post brings you a Diwali (Deepavali) special recipe for my readers from my mom's kitchen, something that's ready in 30 minutes with easily available ingredients. So if you are like me, a totally last minute person, who is sometimes completely unprepared for the festivals that suddenly come up, this is the perfect recipe for you. 

In my usual style, last evening, I kept the pan on the flame and then called my mom, "How do you make your chocolate cake?". In my family, prior to my generation, the only cakes that were made at home were these kinda 'cakes' - or in culinary terms they would be better called 'squares' or 'fudge'. How soft or hard you want the burfi depends on how much time you allow this to be on heat. My recipe gives you an in between consistency, so it cuts into neat squares. If you want it more soft set, try to remove it from flame onto the baking sheet 5 minutes earlier. These burfis are pretty much trial and error, and are a little trickier than baking cakes, but they are fun experience with a fair bit of arm workout, which we all could do with, given how much we end up gorging on during the festive season. 
If you don't have cocoa powder or if you don't prefer chocolate flavour, [wondering if there are such people in the universe;)] you can avoid the cocoa and add powdered cardamom or a few saffron strands towards the end to get plain milk burfi.

So this special recipe from my mom's kitchen, especially for you! Your last minute, go-to Diwali treat recipe :) Happy Diwali from the Saffron Trail Kitchen to you and your loved ones.


For latest updates from my kitchen and to know about the workshops lined up from the Saffron Trail Kitchen, LIKE my facebook page - http://www.facebook.com/saffrontrail


Recipe for Chocolate Burfi (cake)
30 minutes
Makes 16-20 pieces, depending on the size

Ingredients
500 ml milk (3% cow's milk)
1 cup granulated sugar
4 tbsp ghee (clarified butter)
1 tbsp rava (semolina, fine is better)
2 tbsp cocoa powder + 3-4 tbsp warm milk

Directions

  1. Line a deep dish or a baking tray with a parchment paper or grease with a few drops of ghee and keep aside. A size of 8x4" will do, but if you have a bigger thaali / dish, make sure you don't spread over the entire surface or the burfis will be very thin and fragile.
  2. In a heavy bottomed pan, place the milk, sugar, ghee and rava. Bring to boil on a high flame with constant monitoring and stirring. Once it comes to a boil, reduce flame and allow to simmer with reasonably constant stirring to make sure the milk does not burn or catch at the bottom of the pan, or doesn't boil over.
  3. After stirring and simmering for around 20 minutes, the milk will turn much thicker, roughly the consistency of dosa / pancake batter. Whisk the cocoa powder in warm milk and pour into the thickening milk with constant stirring.
  4. In another 5-8 minutes (continue stirring), the mixture will turn much thicker leaving the sides of the pan. At this point switch off flame, because it will continue to thicken in the residual heat.
  5. Pour / transfer the mixture over the greased parchment, taking care to spread over a smaller area if you want thicker burfis.
  6. Let this cool for 15 minutes after which you can cut into squares / rectangular bars with a sharp knife or a pizza cutter.
  7. Store in airtight container and consume in 3-4 days. Keeping them in the fridge makes them too hard and I personally don't like them cold.
They make excellent homemade gifts on Diwali on any other festival. You could easily double the recipe, using 1 litre of milk. That will take around 45 mins-1 hour to thicken and prepare into burfis.

More Diwali treats from the archives:

Okkarai
Teratti Paal - Milk fudge
Dudhi Halva - bottle gourd fudge
Baked Karanji
5 minute microwaved besan laddoo
Eggless mawa cake
Khaja


Wednesday, 23 October 2013

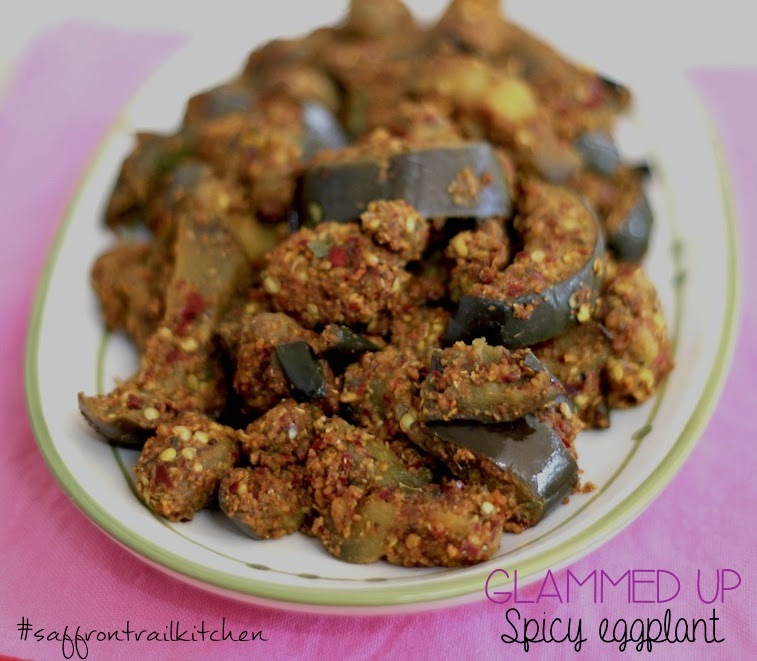
The secret to making a glammed up eggplant curry

By Our Traveler Guide   Posted at  07:05   Vegetable : Eggplant No comments

Eggplant is one vegetable that you can either hate or love but never ignore. For all my childhood, I was an eggplant hater, may be even allergic to some varieties. Nothing life threatening, just this crazy itching in my mouth when I ate some types of eggplant. Then for years I was a fence sitter. Okay, "this is made for lunch so I will eat the tiniest bit, just to keep you happy" kinda fence sitter. And then I discovered cooking this versatile vegetable and while I wont call myself an eggplant lover, I am now a fan. 


Baingan Bharta, Vangi baath, Baba Gannoush, stuffed eggplant, gosh I have quite a list of favourite recipes with this vegetable. This recipe is an easier variation of the stuffed eggplant. You still have to roast the spices and grind them, but no painstaking stuffing involved. This is the smarter way to enjoy the tastes of a stuffed eggplant. This dry curry goes well with rotis and great with rice and sambar. I have used the large round eggplant for this recipe, which is the kind I prefer because it has fewer seeds and cooks faster. But it should work well with any kind of eggplant. Make sure the pieces are uniformly chopped so they cook evenly. This coarsely ground spice powder is the secret to glamming up any boring vegetable or any vegetable you don't know what to do with.


Recipe for Spicy Eggplant Curry
Serves 4


Ingredients

2 tbsp oil
pinch of asafoetida
1/4 tsp mustard seeds
1 large globe eggplant cut into wedges or thick batons, soaked in water
1/2 tsp turmeric powder
1 tsp salt
1 tsp amchoor powder or 1 tsp tamarind paste

Ingredients to grind for the spice mix:

3 large dried red chillies
2 tbsp chana dal
2 tbsp coriander seeds
1/2 tsp fenugreek seeds
1 tbsp fennel seeds
1 tsp cumin seeds
1 tbsp udad dal
1 sprig curry leaves
1 bay leaf

Directions
In a large wok / kadai, dry roast all the spices together, until the chana dal and udad dal turn golden brown. Remove, cool and grind to a coarse powder.
In the same wok, heat 2 tbsp oil. Add the asafoetida and then drain and squeeze out all the water from the eggplant pieces and add them to the oil.
Add salt and turmeric and stir the eggplant till well coated. Lower the flame, add a little water at a time, around 1/4th cup, cover and cook the eggplant till nearly done. Don't cook to a mush.
Add the coarse spice powder, amchoor and coat the nearly cooked eggplant with the spices by stirring well. Cover for another 5 minutes with a sprinkle of water if required and let the eggplants cook completely while soaking up the flavours of the spices. The coarsely powdered dals give the vegetable a nice crunchy texture.
Serve hot with rotis or with dal & rice.

Note:

If you don't find a big eggplant, use 8-12 smaller sized eggplants for this, cutting each into wedges. This spice mix works for other vegetables like bottle gourd, snake gourd, capsicum, potato, sweet potato etc. Follow the same method of sauteeing the vegetable until nearly done, adding the spice mix, stirring to coat well and then cover and cook for 5 mins till vegetable is fully cooked and infused with spice flavours.

Wednesday, 16 October 2013

Khamang Kakdi : The best cucumber salad ever

By Our Traveler Guide   Posted at  21:06   Vegetable : Cucumber No comments
I'm a Bombay girl, born, brought up and spent all my years in that city. In fact, my maternal family has been in Bombay for three generations before me, so our attachment to that cuty is deep rooted.

I've been out of my home city for some 4 years now and while I surely don't miss the burgeoning crowds, the crazy way my heart would stay in my mouth until I boarded that local train and got inside the compartment or the fear of a bike running over my feet the second I stepped out of my building, I do miss the other things about the city. The beautiful open air markets is surely one of them. And the other is the food. Vile Parle, where I spent my last 4 years in Bombay was a veritable Mecca of street food and  it's generally amazing how that city has something for everybody. 

Now, Maharashtrian cuisine, is quite different from the Bombay street food. It is divided into several regions such as coastal, Kolhapuri, Puneri etc. While i'm not the best person to be talking about all the regional variations, I can tell you what my top favourites are - there's Kanda Pohe (Onion Poha) which with chai is the best breakfast I can think of. There's Misal Pav which is that perfect 4 pm snack, where you get a small deep dish filled with spicy peas with a little gravy, that's perfectly mopped up by a piece of bread (pav). Also, the Maharashtrian style of making rotis, or Tel PoLi as it is called, is simply a most amazingly soft, muslin handkerchief like Indian bread, made of whole wheat flour. I was quite thrilled to hear about a Maharashtrian home style restaurant opening near my place and I'm happy to report that their 'poLi' hits the spot. You could eat 3 of them and still feel there's space for more.

All that said, the ultimate delicious thing in Marathi cuisine for me, is this simple cucumber salad called 'Khamang Kakdi'. I tried this for the first time in the Marathi restaurant 'Diva Maharashtracha' in Mahim (Bombay) and fell head over heels in love with its taste & texture. While cucumber is a fairly palatable veggie as it is, in it's raw form, adding some condiments, some herbs and some spices to this, gives it a whole new personality. It goes as the perfect side dish to your regular roti and subzi. Try it and you'll not settle for any other random cucumber salad. I'm sure there are various ways to make this and many recipes, but this is how I make it.


Recipe for Khamang Kakdi (Maharashrian / Indian cucumber salad)
Serves 4
Time taken - Under 15 mins

Ingredients
2 large cucumbers, peeled and diced
1 tbsp freshly scraped coconut
2 tsp peanut oil or any other cooking oil
1/4 tsp mustard seeds
1/2 tsp cumin seeds
1 sprig curry leaves
2 green chillies, finely sliced
pinch of asafoetida powder
3/4 tsp salt
1 tbsp chopped coriander
juice of 1/2 lemon or 2 tbsp yogurt (optional)
1/4 cup roasted peanuts, coarsely pound

Directions
In a big bowl, place the diced cucumber and coconut.
Heat the oil in a small pan. Temper the mustard and cumin seeds, curry leaves, chillies and add the asafoetida towards the end, just after you switch off the flame. Transfer this tempering over the cucumbers.
Add the salt, coriander and toss well, adding the lemon or yogurt if using.
Serve immediately or refrigerate, adding the peanuts and tossing well just before serving, so that they remain crunchy.
Serve with poLi/roti and vegetable curry or eat as it is as a snack time salad.

Thursday, 12 September 2013

Quick Bite : Indian Bruschetta

By Our Traveler Guide   Posted at  02:01   Paneer No comments

I baked this partly whole wheat bread with flaxseeds this week. The only problem with baking your own bread is you can't stop eating it. The possible upside is that you can slice your bread as thin as you want to :) I can almost see all those of you who bake your own bread nod your heads solemnly. I usually try and avoid starting my day with bread, but when it's homemade, you are looking for every possible excuse. So this is what I had for breakfast today - thinly sliced bread, toasted on a low heat on the tava, rubbed with a clove of garlic and topped with a simple paneer mixture. This breakfast ticks all the boxes - good carbs, protein, veggies, fibre. Yay!

I've announced my first class on Baking Basics for 21st September. Do check the details on my Facebook page and do write in with your suggestions and queries.

Bruschetta - Indian style


Bruschetta - Indian Style
Serves 1
Time taken - 15 minutes

Ingredients
2 slices of wholegrain bread 
1 clove of garlic, peeled
1 tsp olive oil
1 tbsp finely chopped onions
1 small tomato, deseeded and finely chopped
1 tbsp finely chopped coriander
1/4 cup paneer, cut into small cubes
1/4 tsp salt
Pinch of red chilli powder

Directions
On a skillet or in the toaster, toast the bread till golden and crisp.
Meanwhile, heat the oil in a small wok and saute the onions till translucent (~2 mins). Add the tomatoes, coriander and saute for another minute. Don't fry the tomatoes to a mush. Add the paneer, salt, red chilli powder and stir gently till seasoned through. Remove from heat and keep aside.
Rub the clove of garlic all over the toasted slices of bread(one side).
Divide the paneer mixture equally between the two (or three, depending on size of bread) slices.
Eat immediately.

This makes for a wholesome breakfast or good for lunch too, when paired with a soup.


Monday, 15 July 2013

Making a healthier Idli using Foxtail Millet

By Our Traveler Guide   Posted at  06:31   Whole grains No comments
Idli and dosai are two dishes which can be easily experimented with, with a variety of whole grains. If you are a regular reader of my blog, then you'll know that my whole-grain find of this year is Foxtail Millet- you'll find a couple of recipes featuring them already. It's thanks to our online grocery store that stocks a lot of these ancient grains and greens that you won't find in supermarkets that they end up finding their way in many new dishes I experiment with. While I've been using the millet grain in salads, patties, upma etc, this time I bought the foxtail millet idli rava to try making idlis. It turned out reasonably soft, definitely denser than white rice idlis- but that's the whole grain effect- the end products always turn out denser. The advantage of this being you can't eat as many idlis as you can of the regular ones. Initially you could try substituting 50% of the rice / idli rava with this millet rava and then go to a 100%. 


In India: Tinai, chamai, kavalai, kambankorai are some of the names for millet in Tamil. Nuvanam is millet flour. The gruel made from millet, the staple of Ancient Tamils, is called kali, moddak kali, kuul, and sangati. Korralu (Telugu), Navane (Kannada) [Source: Wikipedia]

An idli is a healthy dish as it is, being a combination of a rice and lentil (udad dal), makes a complete set of amino acids, resulting in a good quality protein. So you can alternate between regular idlis and those made using millets, to get more fiber and a variety of nutrients.


A healthier version of Idli


Foxtail Millet Idli
Makes roughly 32 or more idlis, depending on the size, you could use this batter over 3-4 days for a variety of dishes such as dosai, uthapam, kuzhi paniyaram etc.

1 cup whole or split udad dal (without skin)
1 tsp fenugreek seeds (optional)
2 cups foxtail millet rava (or use 1 cup millet rava and 1 cup rice)
2 tsp salt
Optional
finely chopped veggies to add to idlis
1/2 tsp Grated ginger, mustard seeds, chana dal, red chillies tempered in oil to add to batter before steaming


Soak the udad dal + fenugreek seeds in plenty of water. In another bowl, soak the rava in water that covers it completely.
After 3 hours- drain water from udad dal and grind to a fine paste in the mixer or wet grinder. Remove in a big bowl.
Squeeze all the water from the millet rava and grind this to a fine paste too. Add to the udad dal paste and mix well, adding salt. Add upto 1/2 cup water if batter is very thick. 

Place in a large container with a fitting lid. This will expand to nearly double volume over 8-10 hours, so keep accordingly in a sizable container.
Once fermented, you can either use this immediately to make idlis / dosa or place in refrigerator immediately and use when required (within next 3-4days).

Remove the required quantity of batter 
To make idlis, lightly grease the idli moulds with oil, pour batter into each mould (not more than half capacity), top with any chopped veggies if required, close the pressure cooker lid but remove the weight so that this steams and doesn't pressure cook. If you have a special idli maker, then use that. Keep the flame on high and then reduce to medium once the steam is in full flow. Steam for around 12 minutes on medium flame. Open the cooker after 10 minutes or so, removing the idli stand. Sprinkle some cold water on top of each mould and with a sharp edged steel spatula or a knife, unmould each idli cleanly.

Serve with any chutney or your choice, or molagapodi or ketchup for the kids. 

Other recipes using Foxtail Millet
Salad with nutrition facts included
Millet-Basil Patties


Saturday, 22 June 2013

Raw Banana & Paneer Kababs

By Our Traveler Guide   Posted at  23:57   Vegetable : Plantain No comments
Simple to make and delicious, these kababs were a part of dinner last night. Sufficiently pushed by the good folks who follow my blog's Facebook page, who asked me to share this recipe when I posted a picture - this quick post is for them :) These make a perfect starter, you could make these even smaller for bite sized pieces. I'm sure they'd taste good rolled up in soft phulka rotis.


Recipe for Raw Banana & Paneer Kababs
Makes 10 medium sized kababs

Ingredients
3 small raw bananas
1/2 cup paneer - finely crumbled or grated
fresh coriander leaves, chopped
2 tbsp of finely chopped onion
1 tsp coriander powder
1/2 tsp red chilli powder
1 garlic clove, grated
a pinch of freshly grated nutmeg
1/2 tsp of good garam masala powder (by good, I mean fresh and fragrant)
1 tbsp semolina / bread crumbs
3/4 tsp salt
2 tbsp oil or so to cook the kababs

How to make
Cut the bananas in half (length wise) and pressure cook with peel or boil them until very soft.
Once cool enough to handle, remove peels. These will slip off easily with a squeeze, if the bananas are well cooked. Mash with a fork. 
Add all other ingredients except oil. Pinch off 10 portions, flatten on palm and place in single layer on a plate. Refrigerate for at least 15 minutes or covered with cling film until you need to make them.
Grease a non stick tava / grill pan. Cook these on both side with little oil until golden. Serve hot with chutney or Tabasco sauce.

Note
You can use mashed potatoes instead of raw banana and tofu instead of paneer too! Don't use too much onion, i've deliberately used a couple of spoons only, just for flavouring and not as a vegetable.

Wednesday, 28 November 2012

The secret to absolutely delicious Masala Aloo

By Our Traveler Guide   Posted at  23:33   Vegetable : Potato No comments


I'd first seen this recipe in a cookery show, Khana Khazana, one of the longest running cooking shows in India by Chef Sanjeev Kapoor. What I remember about this one was that he was cooking some authentic Punjabi dishes with his mum. And what I remember from this recipe was one unique technique which I had never seen or read about before. To know what that is, you will have to go read through the entire post.

Potatoes, who doesn't love them? And you might think it is utterly impossible to mess up a potato dish. But look at these culinary competitions like Masterchef Australia and you realise how much thought and process goes into making a simple dish like mashed potatoes. Potatoes are the sponges of the culinary world. They absorb most flavours beautifully, go with any vegetable most amicably and you need to work really hard to make a potato taste BAD!

I think the make or break in most potato dishes is seasoning. They need adequate salt to taste good, or it's just a bland boiled chunk of a starchy vegetable.

I like to do a little teaser off and on, on my facebook page. If something turns out really delicious from the day's cooking, I'll post an Instagram pic of the dish and depending on the responses I get, it ends up featuring on the blog or not. When I posted the picture of this potato dish yesterday, it got many more oohs and aahs than I expected. This one is a recipe any beginner cook (or bachelor cook) can nail. All you need is to manage to cook the potatoes well in their skins. Pressure cooker works best here, but if you have a phobia to my favourite implement in the kitchen, you need some patience to boil the potatoes whole, in their skins, until they are well cooked right till the middle and then proceed with the recipe [Details on cooking potatoes in pressure cooker and pot given at the end of the post].

You could get more adventurous with this recipe using more spices like amchoor (dried mango powder) or crushed dried fenugreek leaves (kasoori methi) but before you go raid the spice aisle, try making this with the basic spices. I can promise you will be wowed!

For my readers from outside India, if you are new to Indian cooking, and you want to try a simple curry recipe, this is the perfect one for you. Few ingredients, simple technique and superb results :) 

All curries are not with gravies and do not require sautéing of onions-tomatoes-ginger-garlic. In fact, in most South Indian cuisines, a curry is a dry saute of vegetables! Potatoes was one of the first things I cooked as a 10 year old girl. My grandmom would keep boiled potatoes ready and I would make a simple potato roast


Recipe Masala Aloo - Spice coated potatoes
Printable version here
Serves 3-4
Ready in under 30 minutes
Vegetarian / Vegan side 

Ingredients
4-5 medium potatoes
1 tbsp rice flour or corn meal
2 tbsp vegetable oil

Fat pinch of asafoetida (optional, but really elevates the taste)
1 tsp cumin seeds
2 tsp coriander powder
1 tsp cumin powder
1/2 - 1 tsp red chilli powder
1/4 tsp turmeric powder
1 tsp salt
1 tbsp finely chopped coriander leave for garnish

Directions

  1. Pressure cook* or boil potatoes until they are well cooked.
  2. Once cool enough to handle, peel the skins and quarter each potato into 4 large pieces.
  3. In a large bowl, toss the pieces in rice flour coating well, and keep aside.
  4. In a large non-stick wok / kadai, heat the oil.
  5. Add asafoetida and cumin seeds. Once the seeds splutter, add the coriander powder, cumin powder, red chilli powder, turmeric powder and SALT to the oil.
  6. Stir well so that all the spice powder INCLUDING salt get cooked in oil.
  7. Do this on a low flame so that none of the spices burn. Immediately, throw in the rice flour tossed potato chunks, stirring gently to coat with the spices and oil.
  8. Cook them on a low flame until all the potato chunks get encrusted with spices, around 7-8 minutes, turning occasionally.
  9. Garnish with finely chopped coriander.


This makes an excellent accompaniment to rotis or sliced bread.
Perfect with steamed rice and any dal.
You could easily customize this recipe for kids by omitting the red chilli powder and following all other steps.

One secret to this recipe is the rice flour (easily available in supermarkets in India or Indian stores abroad). If you cannot find this, you could substitute with corn meal or makkai atta. This is a tip used in Tamil style potato roast, where the coarse rice flour gives the final dish a nice crunch.
The second secret is adding the salt to the oil, which was shown in the Khana Khazana cookery show, by Chef Sanjeev Kapoor's mum. It just makes the potatoes taste so much better seasoned!


How to pressure cook potatoes:
Place scrubbed whole potatoes in a container and place this inside a pressure cooker with an inch high water in the cooker. Do NOT add any water to the container in which the potatoes are kept.
Close pressure cooker lid with the whistle. Keep on high flame and allow two whistles, lower the flame to minimum and let this be on sim for 7 minutes or so. Keep for 10 minutes for bigger sized potatoes, or they will be raw inside.
Once pressure falls, let out excess steam by pulling up the whistle with a pair of tongs and open lid.
Insert a knife inside the potato to check if it is cooked all the way through. Peel when cool enough to handle. Do not wash with water to cool the potatoes quickly, they will become soggy.

No pressure cooker? Read this primer in The Kitchn on how to boil potatoes in a pot.

Details on my debut TV appearance in Twist of Taste / Fox Traveller this weekend here

Monday, 22 October 2012

Khatti Meethi Kaddu Subzi : Punjabi style red pumpkin curry

By Our Traveler Guide   Posted at  04:15   Vegetable : Pumpkin No comments

There are some side dishes that make the calories of a poori worthwhile. Aloo subzi and Chole have always been my favourite accompaniments to this deep fried bread and this pumpkin subzi (curry) is a recent discovery. Tangy, spicy and sweet at the same time, it is a great way to make use of red pumpkin which is in season now. In Bangalore, we find the Disco pumpkin which are smaller in size, the Ironbark or the Japanese, all of which have a deep orange flesh. For this preparation, the former varieties are preferred over the yellow flesh pumpkin used for Olan like Koottu.

This is a Punjabi recipe shared by my friend, Kishi Arora of Foodoholics and this is the way her mom makes it. I think I have more or less followed the recipe she dictated to me on phone. We prepared this with Aaloo Bhaaja, Chole, Halwa and Poori for a perfect Navratri dinner. 


Khatti Meethi Kaddu Subzi / Sweet and sour red pumpkin / butternut squash
Time taken : Under 30 minutes
Serves 4 people

Ingredients
750 grams red pumpkin 
1 tbsp mustard oil 
Fat pinch of asafoetida
1/2 tsp mustard seeds
1/4 tsp fenugreek seeds (methi seeds)
1/2 tsp cumin seeds
1 tbsp amchoor powder (raw mango powder)
1 tsp red chilli powder
1-2 tsp coriander powder
1/4 tsp turmeric powder
1 tbsp crushed jaggery (or brown sugar)
1/2 tsp garam masala powder
1 tsp salt or more to taste
Finely chopped coriander for garnish

Directions

  1. Peel pumpkin and scrape out seeds. Cut into even sized cubes, about 1/2 to 3/4 of an inch big.
  2. In a wide wok / kadai, heat the oil. Add the asafoetida, mustard seeds, fenugreek seeds, cumin seeds. Once the mustard splutters, add the pumpkin cubes and toss well to coat with oil and whole spices.
  3. On medium flame, cook the pumpkin for 5 minutes or so, then add all remaining powdered spices, including crushed jaggery, add 1/2 cup of water, cover and cook on low flame. This will take at least 15-20 minutes to cook. Keep checking every 5 minutes, if any additional water is required, adding 1/4 cup at a time, if necessary.
  4. When cooked, you should be able to crush the pumpkin with the thumb with light pressure but the shape should be retained, and the whole dish should not turn into mashed pumpkin. 
  5. Adjust the red chilli powder, jaggery and amchoor to suit your taste such that it is a good balance of spicy, sweet and sour. If the pumpkin is inherently quite sweet, you don't have to add much jaggery.
  6. Garnish with finely chopped coriander.
Serve hot with pooris or rotis.


Friday, 24 February 2012

Raw banana (plantain) kababs

By Our Traveler Guide   Posted at  09:00   Vegetable : Plantain No comments
Vazhakka or plantain is one of my favourite vegetables. There are at least three favourite ways I make this in true Tambrahm style. One is a roast, where it is sliced thinly and slow roasted until it turns crispy. The other way to make it is to cube it, cook it and saute it with whole red chillies, udad dal, mustard seeds and curry leaves with a garnish of coconut. The third one is a vazhakka podimaas. All three taste yummy with rasam-rice or mor kozhambu and rice. 


Since there are three yummy ways to make this vegetable, I rarely end up making anything else. This time I picked up the plantains with the sole idea of making kababs so they don't end up in one of my favourite curries. I did a quick google search for plantain kababs and the one that appealed most was from Vah Chef Sanjay Thumma. Mine is an adaptation of that recipe.


Kababs are best served with roomali rotis, which are not that difficult to make at home provided you have a tough aluminium/ cast iron kadai that you can turn upside down on the flame and cook the roti on the upturned kadai. Please don't try this with your expensive teflon coated non-stick kadai. 


Also, there is no need to indulge in the dramatics of the chef in the Punjabi restaurants of the 80s and 90s where they would throw a roomali roti in the air in open buffet counters to grab the interest of the diners. 


Roomali Roti


 For the dough, I use a mix of 3 parts atta and 1 part maida, salt and water, rest it for 30 minutes and then roll them out into big sized rotis as thin as i possibly can. I cook this on the upturned kadai kept over a big flame for a few seconds until golden spots appear and repeat on the other side. Fold into quarters and keep in airtight casserole until ready to eat.


Carrot-Radish-Rocket Salad


You can serve this with sliced onions soaked in vinegar for some 30 minutes. I shredded a radish, carrot and sliced a small bunch of rocket leaves-dressed it with lemon juice, salt, pepper and tiny pinch of sugar. It tastes better if you cover this bowl and leave it in the fridge for sometime.


Dinner is served


Recipe for Raw Banana Kababs
Makes 16-20 1" kababs


Ingredients
2 raw bananas
1 potato
1 medium carrot
3 green chillies, finely chopped
1 tsp grated ginger
1/4 cup grated paneer / tofu
handful of finely chopped coriander
1 heaped tsp amchoor powder
1-1.5 tsp salt


Dry roast till fragrant:
1 tsp caraway seeds (shahjeera) or cumin seeds
1 tsp aniseed (saunf)
1 tsp coriander seeds
5-6 whole black peppers
4 cloves
2 green cardamoms


Once cooled, grind to fine powder in spice grinder


Directions:
Halve the raw bananas. Place 1 L water to boil and put the halved bananas. Boil for around 10 minutes, until bananas are tender. Remove from water. Cool, peel and grate.


Pressure cook potato, peel and grate.


Peel carrot and grate.


Add the grated raw banana, potato, carrot along with all the other ingredients included freshly ground spice powder and 1-1.5 tsp salt to the mix and knead until all ingredients are well mixed to make a smooth dough.


Roll into small lemon sized balls and flatted on palm to make 1" sized patties. Place on hot greased tava and cook on medium flame until golden brown. Flip and cook on other sized for 5-7 minutes until golden, adding some oil around the sides, if required.


Serve with roomali roti, salad and chutneys.


I served it with a simple shredded radish-carrot-rocket salad seasoned with salt, sugar, pepper & lemon juice and spicy green chutney.

Monday, 21 March 2011

Aloo Palak Biryani - The Express Way

By Our Traveler Guide   Posted at  23:21   Vegetable : Potato No comments
Things have been kinda quiet around this blog. Those of you who follow me on Twitter might know the reason for the silence on the food blogging front. The husband became the first Indian to run the Atacama Desert. The Atacama Crossing happened between 6 -12 March in Chile. Here's the blog where I have captured all the details of his run, and the links to photos and videos. Although, I couldn't be there personally at the finish line to cheer him, the updates from the organisers and the tons of pictures kept me clued in as to how the husband and the other runners were faring.

Also, I have started a personal tumblog for recording the non-food feelings. From the great response the blog has received, I see that people enjoy reading snippets from others' lives and also identify with a whole of things. It becomes a platform to share thoughts with like minded people who also leave words of empathy and useful advice.
Do read the two recent posts on it and let me know your thoughts.

Coming back to food, last evening was one of those times where I got totally stuck on what to cook for dinner. Having picked up fresh spinach on the way back from my run and I wanted to use it up. I was inspired by the Chhole-Biryani my dad made us one day for lunch when they were here, so I decided to use a similar method and spices to prepare this spinach and potato biryani.

Let me add a disclaimer that this is not made in authentic biryani style such as layering the curry with rice and then cooking under dum, etc. I choose to call this biryani, but if you are too much of a purist, then call this pulao or vegetable rice or by any other name you please. I can promise you this will taste as good. While it took me just around 25 minutes from start to finish because I use the pressure cooker for everything and it speeds up my cooking, if you choose to pan cook the potatoes and rice, this will take somewhat longer.

I loved this fragrant, spicy rice dinner. Paired with raita, it makes a complete meal.


Printer-friendly version of recipe


Recipe for Aloo-Palak Biryani
Spinach and potato rice
Serves 3 people generously
Time taken - Under half hour


Ingredients
1 tbsp oil and ghee
Dry spices
2 cinnamon sticks
1 piece of mace
4-5 cloves
1 black cardamom
1/2 tsp shahjeera (caraway seeds)
1 tsp cumin seeds

1 tbsp ginger-garlic paste

1 large onion, sliced thin
3 cups of shredded spinach
2 tsps of Chhole masala ( I use Goldiee, see notes)
1.5 tsp red chilli powder
1/2 tsp turmeric powder
2 tsp coriander powder
1.5 tsp salt
1/2 cup crumbled paneer, optional
2 large potatoes, cut into big pieces
1 cup basmati rice
5-6 strand of saffron in 3 tbsp of warm milk

Directions

In a pressure cooker, place the washed rice with 2 cups water and pinch of salt. Cover this vessel with a dish and place the large potato cubes on this. Pressure cook for one whistle, keep on sim for 3-5 minutes and switch off the flame. We want both the rice and potatoes to be just done and not mashed.

In a large kadai, heat ghee. Add pinch of asafoetida, all the dry spices. Stir for a few seconds, then add the sliced onions, ginger-garlic paste. Saute on medium heat for 3 -5 minutes, adding the shredded spinach after that. Allow spinach to wilt on high heat.

Once the cooker is cool enough to be opened, remove the potato cubes. Remove the rice onto a large dish, gently separate with fork and allow to cool for 10-15 minutes.

Add the potato cubes to the onion-spinach mix along with the spice powders and salt. Toss gently to coat the potato with spices, let this cook on low heat for 5 minutes with occasional turning, adding the crumbled paneer towards the end.

Add the nearly cooled rice to the mix in the kadai, toss gently till evenly mixed along with saffron-milk.
Cover this with a tight light and let the flavours come together on low heat for 5 more minutes.

Serve hot with raita and papad.

Notes
I highly recommend Goldiee Chhole Ka Masala. After using this for the last 3 years, I can tell you, no other masala comes close. While it is manufactured in Kanpur, most of it is exported to Gulf countries, I believe. My friend who's relatives own this company, is always generous to send me a few boxes of this masala each year which i treasure dearly. All you hing fans, Goldiee Heera Hing is strong and fragrant like NO OTHER. Use it to believe it. And no, I am not getting paid to promote this! Check their website for more details.

All you Aloo-Methi lovers can substitute the spinach with fresh methi (fenugreek) leaves for a delicious variation.

Friday, 22 January 2010

Fresh green peas parathas

By Our Traveler Guide   Posted at  21:08   Vegetable: Peas No comments


'Tis the season of fresh green peas and while I always have on hand large packet of frozen peas, the taste of fresh green peas is something else.
There is an extremely simple recipe - which my friend had shared with me last season, where if you buy large quantities of peas, say 2 kilos or so, you shell them and grind with chillies, ginger and salt, then on a slow flame with a tadka of some cumin, saute this paste with some amchoor powder till quite dry. Store in freezer in small containers and use as a stuffing for parathas to make instant lunches or dinners when required. My version is a slight modification on this as I had just a cup of shelled peas on hand, so I ground them, sauteed and mixed in the flours directly to make these green parathas. These are lovely for a hearty weekend breakfast or your kiddie's lunch box.


Recipe for Green Peas Parathas
Makes 4
Under 30 minutes


Ingredients
1 cup fresh shelled peas
3 green chillies
1 largish knob of ginger
1 tsp or so salt
2 tsp oil
1 tsp cumin seeds
pinch of asafoetida (hing)
1 tsp amchoor powder (dried mango powder)
1/2 cup atta
1/2 cup makkai atta (corn meal) [you can use just 1 cup atta instead of a mix of atta and makkai atta]
some flour for dusting

Directions
  • In a mixer, grind the first four ingredients to a coarse paste.
  • Take the oil in a non-stick kadai (preferably), heat on medium flame, splutter the cumin seeds, add a pinch of asafoetida to this.
  • Transfer the pea paste to the oil and saute on medium flame with the amchoor powder till nearly dry. The amchoor not only adds a tangy taste but also helps in drying out the mixture faster - due to its astringent quality. For this quantity, the process will take 7-10 minutes.
For preparing large quantity of peas-masala to freeze, the procedure is same up to this stage. Just add more chillies, ginger and adjust spices / seasonings.

  • Transfer the ready masala to a bowl. Add the flours and some salt if required and knead to a dough sprinkling some water if needed to bind ( I had to use just a tsp of water of so).
  • Make four balls and roll out gently into thick parathas, using some flour for dusting.
  • Heat a skillet, cook the parathas on both sides on medium flame till golden spots appear, brush with butter or ghee if you like once the sides are cooked.
If you'd like the masala as a stuffing, then use whole wheat atta for the outer cover and prepare like you would any other stuffed paratha.

Serve hot with a chilled raita and pickle of your choice.

I love these chunky parathas which have equal quantities of peas and flour, so its a cross between a hara-bhara patties and a paratha. You could substitute other shelled veggies like fresh green tuvar or fresh green garbanzo instead of peas.

Wednesday, 15 July 2009

Karela with kachori masala - Bitter gourd made better

By Our Traveler Guide   Posted at  20:26   Vegetable No comments
As a child, I didn't have the choice to avoid any foods. Whatever was made at home, I had to eat - and while at that time I hated the rules, I now realise that thanks to this, I appreciate all kinds of foods today.

Bitter gourd was one exception though at that time, where I would have the option to eat something else instead. My grandmother didn't have the heart to force a kid to eat this bitter vegetable. So when I started cooking myself, I would not be interested in buying it in the first place. However in the last few years, this one, like eggplant has gotten added to my weekly shopping list. Whether it's Pavakkai pitlah, Bitter gourd and ripe mango Ayurvedic curry or a dry spice-rich curry like the one below, it's really not that bad, especially when made with all kinds of spices. I usually don't like to drown a vegetable's original taste in spices, but something like bitter gourd really needs that kind of treatment - as the only bitter thing i like to eat as it is, is dark chocolate.

Bitter gourd is very very good for you. Especially if you want to control your blood sugar levels or you are after that flat belly. Here's what longevity expert Dr.Maoshing Ni has to say about bitter gourd -

A melon for natural weight loss
A traditional remedy for losing weight and helping treat diabetes is bitter melon, also known as bitter gourd or balsam pear. Looking a bit like a zucchini with a bumpy surface, its cleansing and mildly laxative properties flush the system of toxins and promote weight loss. Bitter melon contains vitamins A, B1, B3, and C as well as several phytonutrients—including antioxidants like lutein, lycopene, and zeaxanthin. It is a good source of dietary fiber, plus it has two times the beta-carotene of broccoli, twice the calcium of spinach, and double the potassium of bananas!
Surprisingly, only Indians and some other Asians are familiar with this melon / gourd. Indians do have a fascination for all kinds of gourds it looks like :)

For those of you who need an intro with this super vegetable - read about Bitter melon / gourd on Wiki
A more authentic source of info on the Memorial Sloan Kettering Cancer Center about it's anti cancer properties.

This is one recipe guaranteed to make you scratch karela from your hate list :) After all who doesn't like kachories, so any vegetable prepared this way will remind you of the beloved snack.

Bitter gourd made better

Kachori-masalewala Karela
Serves 3-4

Ingredients
3 medium sized bittergourds (bitter melon / karela / pavakkai)
1/4 cup moong dal soaked in hot water
1 - 2 tsp rice bran or any light cooking oil
Whole spices for tempering
1/2 tsp each of
Mustard seeds (rai)
Cumin seeds (jeera)
Fennel seeds (saunf)
Carom seeds (ajwain)
1/4 tsp of fenugreek seeds

Spice powders
Pinch of pure asafoetida
1 tsp of coriander powder
1 tsp cumin powder
1 tsp or more of red chilli powder
1/2 tsp turmeric powder
1 heaping teaspoon of dried mango powder (amchur) or 1 tsp of tamarind paste or 1 tbsp of lemon juice

Others
1 tsp of sesame seeds (optional)
1 tbsp of crushed jaggery
Salt to taste
Fresh coriander to garnish
Freshly scraped coconut for garnish (optional)
Directions
  1. Scrub and wash bitter gourds well. Top and tail them. Cut them open vertically. Scoop out all seeds and membranes inside. Slice them under a cm thin. If necessary, cut once more vertically to give smaller sized slices. I like to pressure cook them in a vessel without extra water for 7 minutes under pressure for fast, nutrient-loss free cooking. You can either microwave or boil the pieces in salted water. Once the cooker has cooled, remove and keep aside.
  2. In a non stick kadhai, heat oil and add asafoetida first. Immediately, throw in all the whole spices for tempering. Stir just until they start spluttering and changing colour, don't brown / burn any spices. Add the sesame seeds last if using, stir for a minute, until it starts spluttering.
  3. Add the moong dal soaked for about 15 minutes in hot water as it is, or coarsely ground. Stir along with the spices on medium heat for about 5 minutes. Add 3/4 cup water to this along with all remaining spice powders/ pastes. Stir around for a minute. Cover and less the dal cook for around 5 minutes. We don't want it to turn mushy, just soft.
  4. Next add the cooked slices of bitter gourd, salt and jaggery. Stir well to coat with spices. Cover and cook for another 5 minutes. Adjust salt and red chilli powder after tasting.
  5. Garnish with fresh coriander. Serve hot with dal & rice or with chapatis / parathas and a bowl of yogurt or kadi (that's what I had for lunch).


Options
You could substitute the moong dal with 1/2 cup of dry roasted gram flour (besan / kadalaimaavu) to make it faster. In that case, just add it when you add the karela slices.
Same method works superbly with snake gourd (pudalankai)- will convert all gourd haters in one bite!
Another method to prepare this is to fill the cavity of one inch sized pieces of either gourd and shallow fry in oil. I don't have the luxury of the time nor the excess oil that the above method uses, so I stick to the low-oil sliced up one.

How to make bitter gourd less bitter

There are a variety of methods here. While I use none of this, as I believe draining the gourd of its bitter jucies reduces its healthful properties, you could use this, especially if you are a first timer with karela.
  1. Slice the gourd as described above the previous night and soak overnight in buttermilk or thinned yogurt with a pinch of salt. Cook next morning after draining well. Take care while you add the salt while cooking as the vegetable would have retained some amount of salt in the soaking process.
  2. Salt the slices with a tsp of salt and leave in a colander for half to one hour. Wash lightly before cooking to remove excess salt.
  3. There's another theory that says soaking in the water in which rice has been washed (starchy water) for a few hours will also remove the bitterness. I haven't tried this one though.

Saturday, 25 October 2008

The Great Indian Vegetable Biryani

By Our Traveler Guide   Posted at  20:25   Vegetable No comments


There are some recipes that escape even a voracious cook - and for me Biryani has been one of them. In most friends' house parties this is one dish that unfailingly features as the main course - a pot of vegetable biryani for the non meat eaters and a mutton biryani for the others. Besides it is commonly ordered in our favourite Punjabi restaurant Urban Tadka (UT) which you must have heard from me pretty often on this blog. In UT, the biryani is made in individual clay pots sealed with dough and baked in the tandoor - and in all my biryani encounters, I can easily rate theirs as the best. One evening when DH suggested vegetable biryani with raita for dinner - it struck me that this is one dish that has eluded me all these years and why not try my hand at it.

Of all the recipes I found on food blogs and general food websites, I found this video by Vah Chef Sanjay Thumma very educative. Only problem with his video that he doesn't mention how much of each ingredient to use. So here's my version of his recipe.
Since there quite a lot of ingredients, I will include them along with the directions.

Special apparatus
A large pot along with a wide pan or pot in which the first one will sit comfortably in case you plan to finish off the final stage on stove stop, or else you can bake it off in the oven.

Preparation
  1. Wash 2 cups long grained basmati rice gently and soak for an hour in a large bowl.
  2. Slice 4 medium onions very finely, separate. You can either deep fry these or bake them in the oven till brown or shallow fry them on a non stick pan coated with oil on a very low flame (around 15 minutes or so)
  3. Vegetables for the biryani - 1 small cauliflower broken into large florets
    2 medium carrots, scraped and cut into large pieces
    3 medium potatoes, peeled and cut into large wedges
    1/2 - 1 cup fresh or frozen green peas
    2 large capsicums, deseeded cut into large squares
  4. Fry 3 tbsp cashews and then 2 tbsp of raisins in hot ghee on a low flame, drain and keep aside.
  5. Chop roughly 1/2 cup mint leaves and 1/2 cup coriander leaves. Keep aside.
  6. Soak a large pinch of saffron strands in 1/2 cup of warm milk. Keep aside.

Directions

  1. Heat 2 tbsp ghee in a large non stick pot.
  2. Add to the hot ghee, 3 bay leaves, 3 sticks of cinnamon 1" each, 2 black cardamoms, 2 green cardamoms, 4 cloves, 2 tsp cumin seeds and toss on a low flame.
  3. Next, add 2 tbsp of ginger garlic paste and saute for a minute till cooked.
  4. Throw in all the chopped vegetables, 2 tsp of salt, 2 tsp of red chilli powder, 1 tsp turmeric powder, 2 tbsp of coriander powder, 1 tbsp cumin powder, 2 tsp garam masala powder, 3 slit green chillies, handful of mint leaves and saute well to coat all the vegetable chunks evenly. On a low flame let the vegetables cook till they are 60-70% done, sprinkling some water at intervals if necessary. To this finally add 200 grams paneer cut into large cubes and toss well.
  5. Once the vegetables are in the nearly done stage, add 3 cups of thick homemade / Greek yoghurt and stir on a low flame till the veggies are well coated with the spicy yoghurt sauce. Check for salt and adjust as per taste. Keep this aside.
  6. Meanwhile bring to a boil around 3-4 Litres of water in a large pot - add around a tsp of salt, 2 bay leaves and 1 tbsp ghee / oil and add the drained soaked rice grains. Let this boil for around 5-7 minutes and check if nearly done. At the 75% done stage drain the rice out in a colander. Turn this onto a large plate, spread it out gently with forks and let it cool.
Assembly (for the stove top method)
  1. In the large pot (that fits inside of another pan), first layer the half the rice. Add half of the vegetable-paneer-yogurt mix. Top with half of the browned onions, fried nuts-raisins and chopped herbs.
  2. Add a cup of beaten yogurt on top of this.
  3. Top with rest of the rice and repeat the remaining onion-nuts-herbs layer over the rice.
  4. Cover the pot with 2-3 layers of thick aluminium foil. Cover with a fitting lid.
  5. Place 2-3 cups of water in the larger pan. Keep over high heat. Place the covered pot with biryani in this pan and let the water simmer for 15 minutes.
  6. Remove the pot from the pan and keep aside for 30 minutes or so for the flavours to develop fully before serving.
  7. Serve with any vegetable / fruit raita that is chilled.

For those of you who would like to bake off in the final stage, layer as above in a oven proof deep pan and seal well with foil. Bake for 15-20 minutes. Serve as above.


Although this was not as good as my favourite restaurant's biryani, this is mighty good for a first attempt and I would give all credit to Chef Sanjay's video, which you might check out for a quick recap. I hope the quantified ingredients here make it a tad simpler for those of you wanting to try out the Great Indian Vegetable Biryani.

This recipe serves around 6-8 people for a main course along with raita made from 1 Litre yogurt.
I understand that the list of ingredients runs pretty long, but really you'll find most of the stuff in your pantry. The paneer is optional here, but it adds a nice variation to the texture of vegetables. You could also try boiled chickpeas as a protein addition instead of paneer.
(all ingredients for this recipe are marked in bold in the various stages of description)

Back to top ↑
Connect with Us

What they says

© 2013 Cook Crowd. WP Mythemeshop Converted by Bloggertheme9
Blogger templates. Proudly Powered by Blogger.