Showing posts with label Vegan. Show all posts

Wednesday, 23 October 2013

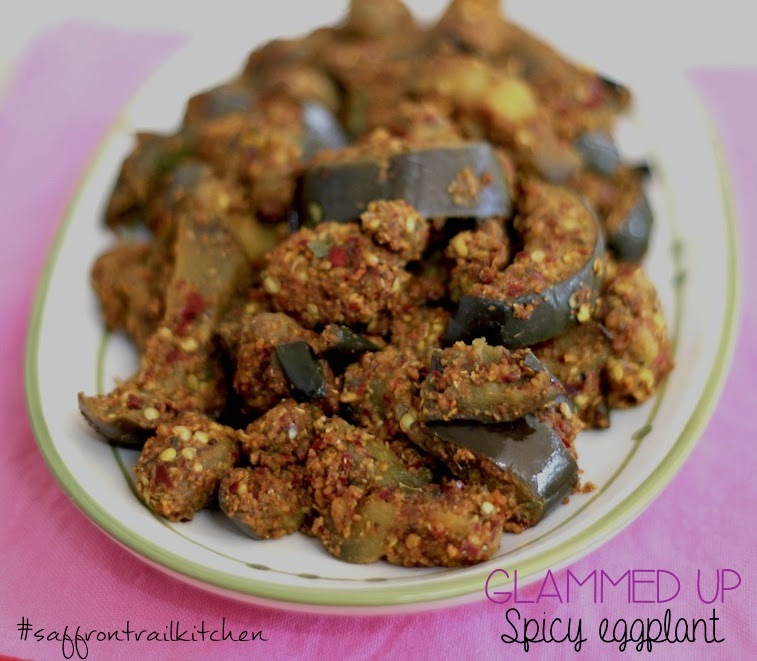
The secret to making a glammed up eggplant curry

By Our Traveler Guide   Posted at  07:05   Vegetable : Eggplant No comments

Eggplant is one vegetable that you can either hate or love but never ignore. For all my childhood, I was an eggplant hater, may be even allergic to some varieties. Nothing life threatening, just this crazy itching in my mouth when I ate some types of eggplant. Then for years I was a fence sitter. Okay, "this is made for lunch so I will eat the tiniest bit, just to keep you happy" kinda fence sitter. And then I discovered cooking this versatile vegetable and while I wont call myself an eggplant lover, I am now a fan. 


Baingan Bharta, Vangi baath, Baba Gannoush, stuffed eggplant, gosh I have quite a list of favourite recipes with this vegetable. This recipe is an easier variation of the stuffed eggplant. You still have to roast the spices and grind them, but no painstaking stuffing involved. This is the smarter way to enjoy the tastes of a stuffed eggplant. This dry curry goes well with rotis and great with rice and sambar. I have used the large round eggplant for this recipe, which is the kind I prefer because it has fewer seeds and cooks faster. But it should work well with any kind of eggplant. Make sure the pieces are uniformly chopped so they cook evenly. This coarsely ground spice powder is the secret to glamming up any boring vegetable or any vegetable you don't know what to do with.


Recipe for Spicy Eggplant Curry
Serves 4


Ingredients

2 tbsp oil
pinch of asafoetida
1/4 tsp mustard seeds
1 large globe eggplant cut into wedges or thick batons, soaked in water
1/2 tsp turmeric powder
1 tsp salt
1 tsp amchoor powder or 1 tsp tamarind paste

Ingredients to grind for the spice mix:

3 large dried red chillies
2 tbsp chana dal
2 tbsp coriander seeds
1/2 tsp fenugreek seeds
1 tbsp fennel seeds
1 tsp cumin seeds
1 tbsp udad dal
1 sprig curry leaves
1 bay leaf

Directions
In a large wok / kadai, dry roast all the spices together, until the chana dal and udad dal turn golden brown. Remove, cool and grind to a coarse powder.
In the same wok, heat 2 tbsp oil. Add the asafoetida and then drain and squeeze out all the water from the eggplant pieces and add them to the oil.
Add salt and turmeric and stir the eggplant till well coated. Lower the flame, add a little water at a time, around 1/4th cup, cover and cook the eggplant till nearly done. Don't cook to a mush.
Add the coarse spice powder, amchoor and coat the nearly cooked eggplant with the spices by stirring well. Cover for another 5 minutes with a sprinkle of water if required and let the eggplants cook completely while soaking up the flavours of the spices. The coarsely powdered dals give the vegetable a nice crunchy texture.
Serve hot with rotis or with dal & rice.

Note:

If you don't find a big eggplant, use 8-12 smaller sized eggplants for this, cutting each into wedges. This spice mix works for other vegetables like bottle gourd, snake gourd, capsicum, potato, sweet potato etc. Follow the same method of sauteeing the vegetable until nearly done, adding the spice mix, stirring to coat well and then cover and cook for 5 mins till vegetable is fully cooked and infused with spice flavours.

Wednesday, 16 October 2013

Khamang Kakdi : The best cucumber salad ever

By Our Traveler Guide   Posted at  21:06   Vegetable : Cucumber No comments
I'm a Bombay girl, born, brought up and spent all my years in that city. In fact, my maternal family has been in Bombay for three generations before me, so our attachment to that cuty is deep rooted.

I've been out of my home city for some 4 years now and while I surely don't miss the burgeoning crowds, the crazy way my heart would stay in my mouth until I boarded that local train and got inside the compartment or the fear of a bike running over my feet the second I stepped out of my building, I do miss the other things about the city. The beautiful open air markets is surely one of them. And the other is the food. Vile Parle, where I spent my last 4 years in Bombay was a veritable Mecca of street food and  it's generally amazing how that city has something for everybody. 

Now, Maharashtrian cuisine, is quite different from the Bombay street food. It is divided into several regions such as coastal, Kolhapuri, Puneri etc. While i'm not the best person to be talking about all the regional variations, I can tell you what my top favourites are - there's Kanda Pohe (Onion Poha) which with chai is the best breakfast I can think of. There's Misal Pav which is that perfect 4 pm snack, where you get a small deep dish filled with spicy peas with a little gravy, that's perfectly mopped up by a piece of bread (pav). Also, the Maharashtrian style of making rotis, or Tel PoLi as it is called, is simply a most amazingly soft, muslin handkerchief like Indian bread, made of whole wheat flour. I was quite thrilled to hear about a Maharashtrian home style restaurant opening near my place and I'm happy to report that their 'poLi' hits the spot. You could eat 3 of them and still feel there's space for more.

All that said, the ultimate delicious thing in Marathi cuisine for me, is this simple cucumber salad called 'Khamang Kakdi'. I tried this for the first time in the Marathi restaurant 'Diva Maharashtracha' in Mahim (Bombay) and fell head over heels in love with its taste & texture. While cucumber is a fairly palatable veggie as it is, in it's raw form, adding some condiments, some herbs and some spices to this, gives it a whole new personality. It goes as the perfect side dish to your regular roti and subzi. Try it and you'll not settle for any other random cucumber salad. I'm sure there are various ways to make this and many recipes, but this is how I make it.


Recipe for Khamang Kakdi (Maharashrian / Indian cucumber salad)
Serves 4
Time taken - Under 15 mins

Ingredients
2 large cucumbers, peeled and diced
1 tbsp freshly scraped coconut
2 tsp peanut oil or any other cooking oil
1/4 tsp mustard seeds
1/2 tsp cumin seeds
1 sprig curry leaves
2 green chillies, finely sliced
pinch of asafoetida powder
3/4 tsp salt
1 tbsp chopped coriander
juice of 1/2 lemon or 2 tbsp yogurt (optional)
1/4 cup roasted peanuts, coarsely pound

Directions
In a big bowl, place the diced cucumber and coconut.
Heat the oil in a small pan. Temper the mustard and cumin seeds, curry leaves, chillies and add the asafoetida towards the end, just after you switch off the flame. Transfer this tempering over the cucumbers.
Add the salt, coriander and toss well, adding the lemon or yogurt if using.
Serve immediately or refrigerate, adding the peanuts and tossing well just before serving, so that they remain crunchy.
Serve with poLi/roti and vegetable curry or eat as it is as a snack time salad.

Monday, 15 July 2013

Making a healthier Idli using Foxtail Millet

By Our Traveler Guide   Posted at  06:31   Whole grains No comments
Idli and dosai are two dishes which can be easily experimented with, with a variety of whole grains. If you are a regular reader of my blog, then you'll know that my whole-grain find of this year is Foxtail Millet- you'll find a couple of recipes featuring them already. It's thanks to our online grocery store that stocks a lot of these ancient grains and greens that you won't find in supermarkets that they end up finding their way in many new dishes I experiment with. While I've been using the millet grain in salads, patties, upma etc, this time I bought the foxtail millet idli rava to try making idlis. It turned out reasonably soft, definitely denser than white rice idlis- but that's the whole grain effect- the end products always turn out denser. The advantage of this being you can't eat as many idlis as you can of the regular ones. Initially you could try substituting 50% of the rice / idli rava with this millet rava and then go to a 100%. 


In India: Tinai, chamai, kavalai, kambankorai are some of the names for millet in Tamil. Nuvanam is millet flour. The gruel made from millet, the staple of Ancient Tamils, is called kali, moddak kali, kuul, and sangati. Korralu (Telugu), Navane (Kannada) [Source: Wikipedia]

An idli is a healthy dish as it is, being a combination of a rice and lentil (udad dal), makes a complete set of amino acids, resulting in a good quality protein. So you can alternate between regular idlis and those made using millets, to get more fiber and a variety of nutrients.


A healthier version of Idli


Foxtail Millet Idli
Makes roughly 32 or more idlis, depending on the size, you could use this batter over 3-4 days for a variety of dishes such as dosai, uthapam, kuzhi paniyaram etc.

1 cup whole or split udad dal (without skin)
1 tsp fenugreek seeds (optional)
2 cups foxtail millet rava (or use 1 cup millet rava and 1 cup rice)
2 tsp salt
Optional
finely chopped veggies to add to idlis
1/2 tsp Grated ginger, mustard seeds, chana dal, red chillies tempered in oil to add to batter before steaming


Soak the udad dal + fenugreek seeds in plenty of water. In another bowl, soak the rava in water that covers it completely.
After 3 hours- drain water from udad dal and grind to a fine paste in the mixer or wet grinder. Remove in a big bowl.
Squeeze all the water from the millet rava and grind this to a fine paste too. Add to the udad dal paste and mix well, adding salt. Add upto 1/2 cup water if batter is very thick. 

Place in a large container with a fitting lid. This will expand to nearly double volume over 8-10 hours, so keep accordingly in a sizable container.
Once fermented, you can either use this immediately to make idlis / dosa or place in refrigerator immediately and use when required (within next 3-4days).

Remove the required quantity of batter 
To make idlis, lightly grease the idli moulds with oil, pour batter into each mould (not more than half capacity), top with any chopped veggies if required, close the pressure cooker lid but remove the weight so that this steams and doesn't pressure cook. If you have a special idli maker, then use that. Keep the flame on high and then reduce to medium once the steam is in full flow. Steam for around 12 minutes on medium flame. Open the cooker after 10 minutes or so, removing the idli stand. Sprinkle some cold water on top of each mould and with a sharp edged steel spatula or a knife, unmould each idli cleanly.

Serve with any chutney or your choice, or molagapodi or ketchup for the kids. 

Other recipes using Foxtail Millet
Salad with nutrition facts included
Millet-Basil Patties


Friday, 22 February 2013

Eggless Buckwheat Crepes : Health on a plate

By Our Traveler Guide   Posted at  18:43   Whole grains No comments


Last Saturday, I looked at my dinner plate and I felt "Damn, it should be illegal to eat this healthy on a Saturday night." Yes it was so good that it was bad. And we were watching a brilliant brilliant series to add all the necessary wickedness and spice to this healthy plate. 

You may think food bloggers have proper weekly menus and they are always on the top of what to feed their families every single day. In my case, that's so wrong. I print out menu formats. I order my weekly produce and groceries and think of making a plan that will use them in the most systematic manner. But no, that never happens. I'm best when I'm impulsive. And sometimes there are so many bits of assorted vegetables leftover that even the most creative part of my brain wont figure out how to put them together. 

I've come up with an idea for such situations. One is to make this all forgiving Tamil dish called Poricha koottu where you throw in every possible vegetable (well, not actually, but it works), add mashed dal, a freshly ground masala and you're done. It tastes fabulous with steamed rice or broken wheat or any such grain. The other idea is if there are 3-4 leftover veggies, microwave them individually and then saute them individually in some olive oil and garlic, adding a pinch of salt and lots of pepper in the end. This is much better than 'boiling' them. Microwaving them for a short burst of time with very little water (1-2 tsp) keeps them crunchy while not keeping them raw and then everything tastes fabulous with garlic and olive oil. 

But this post is about buckwheat crepes. Having had the authentic French style buckwheat crepes (galettes) from our local pizzeria run by a French lady and her husband, I was inspired enough to buy a bag of buckwheat flour. I tried making crepes using a traditional recipe (using butter, milk, eggs). While the crepes turned out beautiful, the smell of eggs was not the most pleasant feeling for me. This is my own improvised recipe that's egg free and gluten free, because I've used rice flour along with buckwheat instead of all purpose flour. You do need a good non stick skillet / dosa pan to be successful with this. 


Recipe for Eggless Buckwheat Crepes
Makes 5-6 crepes

Ingredients
1 cup buckwheat flour*
1/3 cup rice flour
3/4 tsp salt
3/4 cup water
1/2 tsp baking soda
1 tbsp vinegar
butter or oil to grease pan

Directions

  1. In a mixer jar / food processor, add the flours, salt and water. Spin for 30 seconds, open the jar and bring the contents together using a spatula. Run the mixer for 30 seconds more until you get a smooth batter. Remove this into a bowl and keep covered for 30 minutes. 
  2. You can refrigerate this if you plan to use this much later.
  3. Just before making crepes, add baking soda, add the vinegar on top of the soda and 1-2 tsp of water and beat the mixture well. It will fizz up a bit and the batter will become light.
  4. Grease a non stick skillet. Wipe off excess oil / butter with kitchen tissue. When the skillet is moderate hot, take a ladleful of batter, pour it in the centre and with back of ladle quickly make outward circles to spread the batter to an 8" thin lacy round. As soon as bubbles appear all over the crepe (around 45 seconds) turn it to the other side. Cook for 20 seconds, fold it in half and half again and keep warm.


There's another indulgent way to eat buckwheat crepes. Smear Nutella throughout the crepe and roll it up. 
Also, my other favourite way to eat these is with a filling of sautéed spinach and ricotta or feta cheese.

Buckwheat flour is  naturally gluten-free, high in iron, fiber, protein, selenium and zinc. Read about the numerous health benefits of buckwheat.

*Food Shopping Guide:
You get buckwheat flour in the Gluten Free shelf of Godrej Nature's Basket. It's also available in various organic and health food stores. The one I buy from Nature's Basket is ground along with the skins making it healthier and higher in fibre.

Tuesday, 5 February 2013

Foxtail Millet Salad - An old grain in a new avatar

By Our Traveler Guide   Posted at  23:30   Vegan No comments
Foxtail Millet

Recently, Hindu carried a story on Foxtail Millet on how it used to be the staple of people in rural Andhra and how it was put away when people were supplied with subsidized rice. It has a very short crop cycle of 60-90 days and it can be grown in any season. The article states the re-emergence of this forgotten grain as a diabetic-friendly food, high in fibre, protein and low in glycemic index (causes steady increase in blood sugar post consumption as compared to rice). 
In India: Tinai, chamai, kavalai, kambankorai are some of the names for millet in Tamil. Nuvanam is millet flour. The gruel made from millet, the staple of Ancient Tamils, is called kali, moddak kali, kuul, and sangati. Korralu (Telugu), Navane (Kannada) [Source: Wikipedia]
It cooks as easily as rice in the pressure cooker or using the boiling method. It can be easily eaten with all the side dishes that you would eat with rice - eg. sambar, rasam, curds, dal etc. You can even make pulao, khichdi, pongal, upma and other such dishes with this. If you cook it carefully, each grain stays separate after cooking, and it goes beautifully into salads, adding a lot of body and fibre to your salads. I've read that you can soak and sprout them similar to 'ragi' and powder the sprouted millets for making gruel like weaning foods for babies. The fact that it's naturally gluten free is a boon to people with gluten intolerance. 

Other health benefits of foxtail millet include reducing bad cholesterol and high antioxidant levels. 


This is my first time cooking with this grain and I'm extremely happy with the ease of cooking, texture and taste. It comes close to couscous in texture, only more easily available, much cheaper and locally grown. You can easily precook and refrigerate this so you can add it to soups, salads, burgers, muffins, pancakes - the list is quite endless.


Foxtail Millet Salad 
Time taken: Under 30 minutes
Serves 4

Ingredients
1/2 cup raw Foxtail Millet, soaked for 2 hours in water
1 tsp rice bran oil (or any other cooking oil)
1/2 tsp salt
1/4 cup finely diced red bell pepper
1/4 cup finely diced green bell pepper
1/2 onion, finely chopped
2 cups of any lettuce, washed, dried and cut into bite sized pieces
2 cloves garlic, grated
2-3 tbsp finely chopped coriander leaves
1 medium potato, boiled, peeled, diced
4 strawberries, diced (optional)
1/2 tsp dried mint
Juice of 2 small lemons or 1 big (3-4 tbsp of juice)
Freshly ground black pepper
1 tbsp extra virgin olive oil (or cold pressed coconut oil, if you like the flavour)
Salt to taste

Directions

  1. How to cook foxtail millet: Pressure cook the drained millet with 1 cup water, 1 tsp cooking oil and 1/2 tsp salt for two whistles. Turn off the flame. Remove once cooker is cooled and spread on a plate to cool.
  2. In a large bowl, assemble the bell peppers, onion, lettuce, garlic, coriander leaves, potato, strawberries. 
  3. Crush the dried mint between finger tips and sprinkle around the bowl. 
  4. Add as much freshly ground black pepper as you like. Add the lemon juice, olive oil and the cooled millets. 
  5. Toss well, and add up to 1/2 tsp of salt (or as per taste) and gently get all the seasoning into the salad with a couple of forks.
  6. Serve chilled or at room temperature. 


You can find Foxtail Millet at stores like Namdhari's in Bangalore. I buy it from Towness- our produce and grocery supplier. I'm assuming in other cities, you would get it at the traditional grain merchants, organic stores or health stores over regular supermarkets. 


Wednesday, 28 November 2012

The secret to absolutely delicious Masala Aloo

By Our Traveler Guide   Posted at  23:33   Vegetable : Potato No comments


I'd first seen this recipe in a cookery show, Khana Khazana, one of the longest running cooking shows in India by Chef Sanjeev Kapoor. What I remember about this one was that he was cooking some authentic Punjabi dishes with his mum. And what I remember from this recipe was one unique technique which I had never seen or read about before. To know what that is, you will have to go read through the entire post.

Potatoes, who doesn't love them? And you might think it is utterly impossible to mess up a potato dish. But look at these culinary competitions like Masterchef Australia and you realise how much thought and process goes into making a simple dish like mashed potatoes. Potatoes are the sponges of the culinary world. They absorb most flavours beautifully, go with any vegetable most amicably and you need to work really hard to make a potato taste BAD!

I think the make or break in most potato dishes is seasoning. They need adequate salt to taste good, or it's just a bland boiled chunk of a starchy vegetable.

I like to do a little teaser off and on, on my facebook page. If something turns out really delicious from the day's cooking, I'll post an Instagram pic of the dish and depending on the responses I get, it ends up featuring on the blog or not. When I posted the picture of this potato dish yesterday, it got many more oohs and aahs than I expected. This one is a recipe any beginner cook (or bachelor cook) can nail. All you need is to manage to cook the potatoes well in their skins. Pressure cooker works best here, but if you have a phobia to my favourite implement in the kitchen, you need some patience to boil the potatoes whole, in their skins, until they are well cooked right till the middle and then proceed with the recipe [Details on cooking potatoes in pressure cooker and pot given at the end of the post].

You could get more adventurous with this recipe using more spices like amchoor (dried mango powder) or crushed dried fenugreek leaves (kasoori methi) but before you go raid the spice aisle, try making this with the basic spices. I can promise you will be wowed!

For my readers from outside India, if you are new to Indian cooking, and you want to try a simple curry recipe, this is the perfect one for you. Few ingredients, simple technique and superb results :) 

All curries are not with gravies and do not require sautéing of onions-tomatoes-ginger-garlic. In fact, in most South Indian cuisines, a curry is a dry saute of vegetables! Potatoes was one of the first things I cooked as a 10 year old girl. My grandmom would keep boiled potatoes ready and I would make a simple potato roast


Recipe Masala Aloo - Spice coated potatoes
Printable version here
Serves 3-4
Ready in under 30 minutes
Vegetarian / Vegan side 

Ingredients
4-5 medium potatoes
1 tbsp rice flour or corn meal
2 tbsp vegetable oil

Fat pinch of asafoetida (optional, but really elevates the taste)
1 tsp cumin seeds
2 tsp coriander powder
1 tsp cumin powder
1/2 - 1 tsp red chilli powder
1/4 tsp turmeric powder
1 tsp salt
1 tbsp finely chopped coriander leave for garnish

Directions

  1. Pressure cook* or boil potatoes until they are well cooked.
  2. Once cool enough to handle, peel the skins and quarter each potato into 4 large pieces.
  3. In a large bowl, toss the pieces in rice flour coating well, and keep aside.
  4. In a large non-stick wok / kadai, heat the oil.
  5. Add asafoetida and cumin seeds. Once the seeds splutter, add the coriander powder, cumin powder, red chilli powder, turmeric powder and SALT to the oil.
  6. Stir well so that all the spice powder INCLUDING salt get cooked in oil.
  7. Do this on a low flame so that none of the spices burn. Immediately, throw in the rice flour tossed potato chunks, stirring gently to coat with the spices and oil.
  8. Cook them on a low flame until all the potato chunks get encrusted with spices, around 7-8 minutes, turning occasionally.
  9. Garnish with finely chopped coriander.


This makes an excellent accompaniment to rotis or sliced bread.
Perfect with steamed rice and any dal.
You could easily customize this recipe for kids by omitting the red chilli powder and following all other steps.

One secret to this recipe is the rice flour (easily available in supermarkets in India or Indian stores abroad). If you cannot find this, you could substitute with corn meal or makkai atta. This is a tip used in Tamil style potato roast, where the coarse rice flour gives the final dish a nice crunch.
The second secret is adding the salt to the oil, which was shown in the Khana Khazana cookery show, by Chef Sanjeev Kapoor's mum. It just makes the potatoes taste so much better seasoned!


How to pressure cook potatoes:
Place scrubbed whole potatoes in a container and place this inside a pressure cooker with an inch high water in the cooker. Do NOT add any water to the container in which the potatoes are kept.
Close pressure cooker lid with the whistle. Keep on high flame and allow two whistles, lower the flame to minimum and let this be on sim for 7 minutes or so. Keep for 10 minutes for bigger sized potatoes, or they will be raw inside.
Once pressure falls, let out excess steam by pulling up the whistle with a pair of tongs and open lid.
Insert a knife inside the potato to check if it is cooked all the way through. Peel when cool enough to handle. Do not wash with water to cool the potatoes quickly, they will become soggy.

No pressure cooker? Read this primer in The Kitchn on how to boil potatoes in a pot.

Details on my debut TV appearance in Twist of Taste / Fox Traveller this weekend here

Saturday, 17 November 2012

Yard long beans curry : Karamani curry - Garden to plate

By Our Traveler Guide   Posted at  01:00   Vegetable : Beans No comments
Yard long beans (Chauli / Karamani) have not been my most favourite vegetable, because they are often tough and stringy when bought from the supermarket. Ever since I started growing these in my garden, I've changed my opinion about this vegetable. 


Seeds from Auchan (formerly SPAR) Supermarket, Bangalore


For one, it is a hardy plant, producing a good yield once it starts flowering and fruiting. It's always fun to search for the green delicate long beans among the green leaves and there are a surprise few always hiding in the middle of the foliage. You can pluck them when still tender which means they cook in no time. The overlooked beans can always be used for the mature seeds inside, which you can use in a soup or a vegetable dish. 


I may have said this before, but to avoid any confusion, I must clarify that, 'Curry' in the tamil / Tambrahm cuisine parlance means a dry saute, where boiled or raw chopped vegetables are added to a hot oil after a simple tempering of curry leaves, mustard seeds, udad dal and dried red chillies. And once the vegetable is nearly cooked, a sprinkling of fresh coconut completes the dish. It is almost like a lightly cooked salad and not a gravy dish. Also, it is one of the easiest ways to prepare any vegetable, while retaining it's nutrition, taste and colour.


Karamani Curry / Yard long beans curry
Printable version here
Serves 2-3
Time taken : Under 20 minutes

Ingredients

1 tbsp of oil ( I used organic coconut oil)
Pinch of asafoetida
2 dried red chillies, broken
1/2 tsp mustard seeds
1 tbsp udad dal
2 cups of chopped yard long beans
3/4 tsp salt
1 tsp sambar powder
2 tsp fresh coconut 

Directions
  1. In a large wok / kadai, heat the oil. 
  2. Add asafoetida, immediately adding red chillies, mustard seeds, udad dal. 
  3. Once mustard seeds splutter and dal turns golden, add the chopped beans, salt - stir well and sprinkle water, cover and cook for 8-10 minutes on a low flame. 
  4. Check on the beans every 3 minutes or so, sprinkling some water, if it is too dry or catching at the bottom of the pan.
  5. Once done (tender, but still retaining some crunch), sprinkle sambar powder, stir to mix well.
  6. Remove from flame and garnish with coconut.
  7. Serve with rasam-rice or sambar - rice.
Useful information about growing yard long beans on the USDA site

Friday, 2 November 2012

The perfect lunchbox and recipe for Spinach Pesarattu

By Our Traveler Guide   Posted at  05:23   Vegan No comments
On my Facebook page (Saffrontrail on Facebook) I decided to do a month long series of logging my kid's lunch box and a brief recipe for each of the things. It turned out to be very well received, much more than what I had expected. Taking that cue, I did a column on lunch-boxes for my monthly column in Sunday DNA. Here, I am sharing the same for those who missed it in the papers. I shall be happy to answer your queries in the comment section. 


Whether it is for adults, or kids, the lunchbox presents many dilemmas. What to pack, how much time to spend on preparing it, what will taste good a few hours after packing, what can be made ahead – these are the top questions about packing a proper lunchbox.

A packed lunch should be a portable, less-elaborate version of a lunch you would have at home and by that I mean, well balanced, hygienic and tasty.

Carbohydrates form the base of any meal. One can choose from wholegrain bread, rotis, pita bread, cooked unpolished rice, broken wheat, semolina, pasta, potato etc. Younger kids can do with white sandwich bread as too much fibre can fill them up quickly before they can consume the required calories. Wholegrain sandwiches, stuffed pita bread, fried rice with vegetables or chicken, broken wheat patties, semolina upma, pasta tossed with vegetables or in a salad, boiled potato or potato patties are some of the ways to build the carbohydrate component.

The box needs to have a protein component too. You could choose from chicken, eggs, beans, lentils, cheese, tofu, paneer, yogurt and nuts. Shredded lean chicken can be a part of wraps, sandwiches or pasta. A whole boiled egg, sliced in half and sprinkled with a pinch of salt and pepper makes the perfect addition to a kid’s lunchbox, and the eggs can be boiled the previous night. 
Cooked beans like chickpeas, black-eyed peas, dried peas, rajma can be mashed and added to vegetable patties or made into hummus for sandwiches. Cheese cubes by themselves or in sandwiches are a most popular protein option for kids. Tofu or paneer can be added to dry vegetable curries that can be used to stuff rotis to make a roll. Yogurt can be set in one of the smaller boxes and put in the fridge overnight to be carried in the lunchbox. This makes a good accompaniment to rice and broken wheat based dishes, if the commute is not too long and the workplace / school has a refrigerator. 
Nuts are a great snacking option, rich in a variety of vital nutrients – add this to your kid’s muffins or cookies and to your salad. Taking it in the lunch box is the best way to eat nuts while exercising portion control. Nut butters are good for spreading in sandwiches.

Since both adults and kids need to get five to nine servings of vegetables and fruit, it is important that the lunchbox has a couple of servings from this group. Whatever food is going into the lunchbox, make sure it is fortified with some vegetables (other than potatoes, which are starch component) – for example, green beans and peas in rice, cucumber and carrot sticks with hummus, red bell pepper and zucchini in pasta. Add some pomegranate pearls to raita or curd-rice, grated apples and pears in muffins, sliced banana in peanut butter sandwich.
Once in a while, surprise your kid with a homemade goodie like a cookie or any other treat.

Some sample lunchboxes:
·      Egg Salad Sandwich and watermelon cubes
·      Broken wheat vegetable pulao with plain yogurt or raita
·      Pita bread stuffed with shredded chicken with salad and apple
·      Buttermilk semolina upma with peas and almonds
·      Pasta with spinach and cheese or paneer and orange
·      Vegetable idlis with tomato-onion chutney and a boiled egg


Recipe for Baby Pesarattu with spinach

  1. Soak 1 cup of whole green moong overnight. 
  2. Drain the soaked moong and grind it with a cup of washed and cleaned raw spinach leaves, a small piece of ginger and ½ tsp of salt. This does not require to be fermented. Pesarattu can be made immediately after the batter is ready.
  3. On a lightly greased non-stick tava, spoon out tablespoon full of batter with a little space in between the pesarattu, add a few drops of ghee or oil along the sides and flip when one side is cooked. 
  4. You can sprinkle sesame seeds on one side while the other is cooking. 
  5. Cook the other side similarly and serve with chutney or ketchup. 
  6. If this dish is for adults, you could add a couple of green chillies while grinding the batter.

[originally published in the Sunday DNA - September 23, 2012]

If you liked this post, you could follow the Saffrontrail Facebook page for more frequent updates and pictures.

Tuesday, 10 August 2010

Sunday night dinner - Chickpea Basil burgers

By Our Traveler Guide   Posted at  03:09   Vegan No comments
Whoever said TV dinners cannot be healthy? These burgers are perfect TV food to pile on a plate and curl up on the couch watching your favourite soap or movie. This recipe is another discovery in my quest for high protein vegetarian recipes. The food and dining section of NYTimes, Guardian, WashingtonPost is my regular haunt not only to see the food trends around the world, but invariably I stumble upon some interesting stuff. The recipe of Spinach and Chickpea burgers from The Washington Post is what inspired me to come up with this version.

We all love burgers, at least most of us. This one is way easier than the mixed vegetable burgers, where you have to clean, cut and prepare an assortment of veggies. This one has just two main ingredients - chickpeas and potatoes. Add to this your favourite greens and spices and you have some really filling burgers ready. Eat them as it is, or as an open sandwich or inside a burger bun. Choice is yours. Pair it with slices of fresh cucumber and tomatoes, lettuce if fresh ones are available - to make up for the lack of vegetables in the burger. I like it with a kick of sharp mustard like Coleman's but ketchup, barbeque sauce, pepper sauce, anything is fine.

Chickpeas are vegetarians' best friends to catch up with protein requirements. Not to mention how loaded in fibre and folic acid they are. Two of these patties provide 25% of your daily fibre requirement and 35% of your folic acid requirement. Combine chickpeas with rice or bread and you get a high quality protein from the meal from a combination of various amino acids. The fibre content not only keeps your full for longer but also helps lower bad cholesterol. Fibre also makes sure your sugar levels go up gradually and this is of special benefit for diabetics.


Ingredients
1/2-3/4 Cup dried chickpeas - soaked in lots of water overnight
1/2 cup mashed potato
1/3 cup chopped basil leaves or any other herbs / greens
1 tsp ground pepper
1 tsp salt
1/2 tsp red chilli powder
Besan / gram flour if required

2 tsp olive oil or vegetable oil

To assemble
Bread of your choice (6 burger buns or 12 slices of bread)
Sliced tomatoes, cucumber, washed and dried lettuce leaves
6 cheese slices (optional)
Ketchup, mustard

Directions

  • Pressure cook the chickpeas with 2 cups water for 8 minutes or so. (After 3 whistles, lower the flame and keep on sim for 7-8 minutes)
  • Drain and mash with a heavy mortar or till coarsely mashed in a food processor.
  • In a large bowl, mix mashed chickpeas, potatoes, chopped basil, pepper, salt, red chilli powder.
  • Sprinkle gram flour or bread crumbs if the mixture is too wet.
  • Divide this into six balls, flatten into thick patties and place on a lightly greased non-stick tava / skillet on a medium flame. Grill each side for 5-7 minutes, till golden brown using little olive oil.
  • Remove and keep aside.

Lightly toast the bread for the burger on the same hot skillet. Apply mustard on both slices. Place the cucumber and tomato slices, cheese slice and place the hot burger on the top. Cover with more salad if you like and a slice of bread or the other half of burger bun.

Eat / serve immediately.

Note
If you mash the chickpeas in the food processor, make sure you use the 'pulse' function so it does not turn into a paste, after which it will be tough to shape them into burgers.
You can prepare these upto the 'shaping into patties' stage and freeze them keeping a layer of cling film / butter paper in between and directly grill them on the pan for a weekday dinner.

Saturday, 25 October 2008

Wacky Banana Cake

By Our Traveler Guide   Posted at  19:40   Vegan No comments


There are some blogs I follow because I know their tried and tested recipes will come to my rescue each time I'm facing a dilemma as to what to cook! Then there are some other blogs which I visit purely for reading pleasure - either because I cannot procure most of the ingredients they use or they write predominantly about meat based recipes. Home Sick Texan is one of them. It gives such a view of Texans whose culture, food and general way of life seems so different from the regular American life. I love to read the stories accompanying each recipe and these are more interesting for me that the recipe itself. But this one time, I found a recipe that made me say ' I must try this RIGHT now'. It was her granny's Wacky Cake recipe. The name itself is so appealing, so cute and so retro, and it is indeed a blast from the past. And what's more - no butter, no eggs, no mixing bowl required. Can baking ever get better than this?

If you ever want to bake with your kids, I can only imagine what a deterrent breaking eggs in front of them is - an invitation to gooey mess and not to mention the fear of salmonella from raw eggs, especially in India where the local panwalla who sells them loose (betel leaf vendor) is the nearest source for eggs in a hurry. This is also the best possible cake to bake in the morning for a breakfast for friends who've stayed over. Waking up to the aromas of fresh home baking will make it an unforgettable morning for them. Also, this is the perfect one if you're calling your girl pals over for tea - considerably low cal, ready in a jiffy and just the perfect sweetness to go with tea / coffee.

I have just wiped my hands off after tasting the first piece and it was soft enough to melt in my mouth (even without butter!!!) and then I had to break my prolonged silence here by posting about it. We're having this for our pre-Diwali breakfast and it makes me very very happy and indebted to Home Sick Texan for sharing this recipe - I finally found a vegan recipe for a lovely cake for DH, who's gotten off eggs for a couple of years now and he strictly abides by his no egg policy even when faced with some delicious desserts in the best of places.

Home Sick Texan's Wacky Cake and Wacky Apple Cake Recipes here
I've used a chopped banana in the apple cake recipe along with a part whole wheat flour replacement, and walnuts instead of pecans. Here's my version.

Wacky Banana Cake
Serves 6 atleast
Time to table - 45 minutes
Adapted from here

Ingredients:
1 cup whole wheat flour (I used Ashirwad Atta)
1/2 cup all purpose flour
3/4 cup of sugar - run for a short while in the mixer
1 teaspoon baking soda
1/2 teaspoon of salt
1 teaspoon of cinnamon

1 tablespoon vinegar
1 teaspoon of vanilla extract
5 tablespoons of sunflower or any unflavoured cooking oil
1 cup cold water (not iced)

1 large banana finely diced
1/3rd cup crushed walnuts

Directions:

1. Preheat the oven to 180 C
2. Combine dry ingredients in flour sifter and sift into an ungreased 8x8 square or a 9-inch round baking pan. You can also use a 9-inch cast-iron skillet.
3. Poke three holes into the flour mixture. In the first hole, pour the vinegar. In the second hole, pour the vanilla. In the third hole, pour the oil.
4. Then pour one cup of water into the pan and mix very well.
5. Stir in the diced banana and nuts - shake pan to level off and sprinkle some powdered cinnamon.
6. Place in the oven and bake for 30 minutes or till done.
7. Cut in squares and serve warm.

You'll find all the ingredients for the plain wacky cake in your pantry, so what are you waiting for??

Back to top ↑
Connect with Us

What they says

© 2013 Cook Crowd. WP Mythemeshop Converted by Bloggertheme9
Blogger templates. Proudly Powered by Blogger.