Wednesday, 16 August 2006

How to make South Indian filter coffee

By Our Traveler Guide   Posted at  06:34   Tamil Brahmin Recipes 1 comment


This is a long-intended post. Right since June when my in-laws were visiting us from Chennai. I've always loved the aroma of traditional filter Kaapi. I also have two filters jostling for space in my over-crowded cabinets. Just that I'm not an extremely well-planned person and I can't wait for the coffee to percolate in the morning, when I want my caffeine fix in a hurry. Also, my decoction would always be too watery, so much so that I could easily pour half a cup of decoction into half cup of milk and still it would never be as 'strong' as I'd like it to be.

I observed Mom-in-law's technique when she was here and it was some serious technique. Seriously good coffee in the end. That's how I make my coffee nowadays and I make sure if I want that coffee fix in the morning, I get out my percolator the previous night. Other days it's good old tea. Not that I love tea any less.


Mom-in-law's Filter Kaapi

~You'll need a traditional percolator which is made of 4 parts. You can read the details about it here and buy it too if you wish! A large one costs $15!


~Coffee powder-Well, I'm not the girl to buy coffee beans and grind it fresh. Store bought coffee powder is just fine. A fine grind is used with a small percentage of chicory mixed in. Mom-in-law's brand of choice is from Vimala Coffee works in Chennai.

~Use a clean filter. Remove the lid and umbrella. Put 2 heaped Tbsp of coffee powder per person and press it down with a spoon. Keep the umbella back and gently pour fresh water brought to a rolling boil over the umbrella in the top container.

~The water will percolate down slowly depending on the quantity of powder placed. 6-8 tbsp of coffee powder will take the decoction almost 6-8 hours to collect at the bottom. (So it's better done at night, to have your morning cuppa). If you've put a lot of coffee powder, you wouldn't have a chance to put enough water to percolate resulting in very concentrated but less quantity of decoction at the bottom. In this case once the decoction collects below, you can add more boiling water at the top to collect the concentrate 2-3 times.

~Just remember that the consequent collections wont be as concentrated as the earlier ones. You might want to collect the entire lot and mix it together to get an even concentration of the whole lot of decoction in the end.

To prepare coffee: In a tumbler (traditional steel glass) or a mug, take upto 3/4th level milk and add decoction with constant stirring to make a coffee to suit your liking, mild or strong. Add sugar if you wish. Enjoy the aroma as you take a sip of Madras culture.

Note:
In my opinion, filter kaapi must be drunk in a traditional tumbler-davaraa, and the coffee swished a couple of times between the two to produce delicious foam (norai) on the top. I don't think my mom-in-law approves of this though. The disadvantage being the coffee getting cold while swishing it around ;) It is called Meter-Kaapi in someUdupi hotels as the coffee is poured into the glass from a meter's height to produce maximum foam

I submit this for the fortnightly WBB event on my blog. Have your pick of breakfasts from the fare on the table but wash it down with a tumbler of deliciously hot and aromatic filter kaapi!

Monday, 14 August 2006

Hic...hic...Happy Birthday, dears- Chocolate Rum Apricot Cake

By Our Traveler Guide   Posted at  08:36   Personal No comments


Today is my dear friend Punita's birthday and tomorrow is dear hubby's birthday. We have a small get-together with friends at home. Though I ordered out most of the stuff, dessert is something I wouldn't give up for someone else to do.

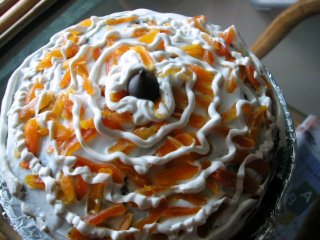
I've baked this Chocolate rum cake for both S and Punita. One cake for two dear people. Actually it's the first time, I've ever made a proper cake with icing etc. It looks pretty delicious, it's to be seen how it tastes. Before it gets all smashed and eaten, here's a pic for you!


Its two layers of chocolate sponge cake with whipped cream inbetween and on the top. The cream is topped by chopped dried apricots soaked in rum. BTW the cake is soaked in rum too :)

So much rum around that when hubby came in home, he said- "I smell rum in the air, are you upto something ?"

Recipe will be posted later. Right now I'm just waiting for my guests who are all delayed by the severe security arrangements due to the terrorist threats in the city. Hope everything passes off peacefully tomorrow...

--------------


Chocolate-Rum-Apricot cake
Makes 12 generous slices
Not for consumption by children

Required:
Two chocolate sponges-baked and cooled (400 g each)
300 ml fresh cream-whipped with 4 tbsp of icing sugar
1/4 cup of sliced dried apricots soaked in dark rum for 2-3 hours
30 ml Bacardi Reserva to soak the sponges
Few tbsp of orange juice
One Hershey's dark chocolate Kisses
Icing bag /Ziploc bag
Icing sugar for dusting

Method:
Mix the Bacardi rum and orange juice and soak both the layers with the rum-juice mixture. Let it rest for 15 minutes until the liquids are fully absorbed.

DUst some icing sugar on a plate and place the bottom layer of the sponge. Spread whipped cream on this layer and place the other layer on top of this. Spread cream on the top of this layer evenly.

Arrange the rum-soaked apricot slices on the cream.


Put the remaining cream into a ziploc bag, give a small nick in the botom corner and use it to make concentric circles on the cake over the apricots. Make the hole slightly bigger and make a flower in the center. Keep four slices of apricot as each of the petals and place a Hershey's Kiss in the center.

Dust the cake with some icing sugar and chocolate shavings (optional). Chill for 1-2 hours before serving.

Verdict-
All my friends LOVED this liquor drenched dessert. The best compliment came from my husband who said that it was the best dessert he had had till date. I just hope it wasn't all the Famous Grouse and the rum from the cake talking :)


Happy Independence Day

By Our Traveler Guide   Posted at  05:04   Personal No comments
Happy Independence Day
On 15th August, 2006, India celebrates her 59th year of Independence.

Tuesday, 8 August 2006

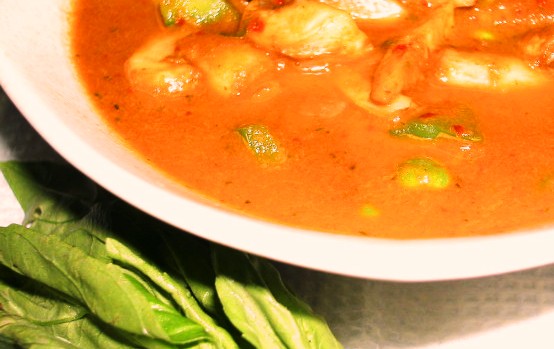
Red hot Thai curry with basil

By Our Traveler Guide   Posted at  21:08   Vegetable No comments

Lemon grass cafe in Bandra is one of my favourite restaurants. They serve a variety of Oriental food. Thai, Singapore, Malaysian, Indonesian, Vietnamese...you name it they have it on the menu. And unlike a run-of-the-mill oriental restaurant, they don't add soy sauce to everything!


I tried re-creating their Ginto (Raw papaya salad) at home, and to our delight it came out exactly the way I wanted it to. Will probably blog about that when I buy raw papaya from the market. I don't like the vague sweetness in food belong to certain Asian cuisines due to use to peanuts and a sweeter version of soy sauce. Spicy Thai red curry is therefore one of my all time favourites. Somehow, I could never lay my hands on an authentic recipe for Thai red curry. I then decided to put together my own ingredients from the tastes I've remembered from my visit to the Lemongrass cafe.

The flavour is heightened with generous use of fresh basil.

Ingredients-

5 dried red chillies ( I used the 'bedki' variety)
8 cloves garlic peeled
1 medium sized onion-roughly chopped
1/4 cup tightly packed basil leaves
1/4 cup thick coconut milk ( I used Dabur homemade)
1 tub fresh mushrooms (wiped thoroughly and chopped roughly)
2 green peppers-chopped roughly
1/2 cup frozen peas.
2 tbsp tomato puree
Salt
Turmeric -pinch
1 tbsp peanut oil / vegetable oil

Method-

1. In a saucepan, take a cup of water. Add the chillies, garlic, onion. Bring to a boil and simmer for 7-8 minutes, till the spices have softened. Remove in a bowl and cool.

2.Once cooled, grind the spices with the basil leaves to a fine paste adding a little bit of water which was used for boiling. In case you dont have tomato puree, you can grind a big tomato into the paste.

3. In a pan, heat the oil. Saute the green peppers with a pinch of tumeric and salt, for 3-4 minutes, then add the mushrooms, peas and saute till almost cooked.

4. Add the red paste, tomato puree, coconut milk, salt to taste. Garnish with freshly chopped basil.

If you thought that was too hot, cool off with my entry to Meeta's Beat the heat- a tall glass of Ginger lemon iced tea.


Notes-

~Serve hot with rice / noodles.

~I served this with instant sevai (Indian rice noodles) and the combination was just perfect. The curry wasn't over the top spicy-probably because the chillies were boiled in water. You can add or subtract the number of red chillies as per your heat-tolerance.

~Thai red curry served with steamed rice and Ginto makes a great dinner combination.

Tags-, , ,


Beat the heat-Monthly mingle

By Our Traveler Guide   Posted at  08:42   How to... No comments


I love iced tea. In fact I love tea in any form. A post solely dedicated to brewing good tea has been long on my mind, and it will come soon.


When Meeta asked us what would one do to beat the heat-my immediate answer was- a tall glass of chilled iced tea. In fact that's the drink I like to have best, when I come home after being outdoors in the harsh afternoon sun. In Mumbai, summers are pretty ruthless. We face the kind of temperatures everyday at which California reports a 100 deaths due to sunstrokes. May be Indians are genetically programmed to bear this kind of sun.

Ginger-Lemon Iced Tea

Ingredients-

One ginger-lemon tea bag, 5-6 cubes of ice, 1 Tbsp honey, 1 Tbsp lime juice, pinch of salt, 4-5 mint leaves finely chopped, 1/4 tsp freshly grated ginger

Boil 1/2 cup water. Steep the tea-bag in boiling water for 5 minutes. Take 5-6 ice cubes in a tall glass. Pour in the tea and other ingredients. Mix well.

Drink chilled.

Check out:

Some wonderful tea recipes in Darjeeling's Tea board of India website here. From basic brewing tips to exotic stuff like Thai iced tea, tea ice cream and almond tea, there's something to surprise you all.


Tags: , ,

Monday, 7 August 2006

How to nurse a half-broken tooth?

By Our Traveler Guide   Posted at  20:42   Personal No comments
One of my molars has been in a perilous condition for a few weeks now.But my dentist phobia combined with general procrasination led to a half-broken dangling molar. I never expected that the tooth that survived the heavy grinding of 'murukku' and 'kadalai urundai' could succumb to a weakling like 'kurmura'.

Since this happened at 3 pm, I had to wait for a local dentist to open shop which would be around evening. As luck would have it, she doesn't practise evenings, without prior appointments. The appointment is scheduled for tomorrow morning. Friends, I need all the luck I can because a dental appointment almost feels like a walk to the gallows. (Biting my nails furiously). Fortunately there's no insurance hassle in the middle, I can just choose to go to anyone I fancy. Why this must feature on a food-blog one might wonder! But aren't teeth intimately related to food?

I've been on liquid diet so far, and any liquids just wont do. They have to be something that can keep me from missing food. (If my mom happens to read this she might mutter under her breath-"Had she kept some religious fasts-she would have been prepared for this! But when has the girl ever listened?"

Two simple recipes to sail through a half-broken tooth (Literally)

Wheat Flour Porridge

Dot a pan with ghee. Put 2 Tbsp of wheat flour in the pan and saute till nice and brown. It will smell so good that you'll think, "How come I didn't know wheat flour could smell so good?". Meanwhile dissolve a Tbsp of jaggery in some water. You can microwave the jaggery with some water for 30 seconds.
Mix one cup of skimmed milk into the jaggery solution. Add this to the golden wheat flour on a low flame and with constant stirring. Sprinkle some cardamom powder to this after the wheat flour is throroughly dissolved and free of lumps.
Add some more cold milk if it's too thick for your liking.

Tasted yum-I almost felt happy to be eating/drinking this.

When can you eat this?

Don't worry, you don't have to break a tooth to eat this wonderful porridge. You can have it for breakfast if you've run out of cereal. Read what I've written about 'Cereal' killers.
Actually this gives me the idea of keeping some roasted wheat flour in stock to make this porridge in a jiffy whenever i feel like it!

Apple honey shake-This was my dinner. But you can have it as a breakfast shake or a post-dinner soothing drink.

Chop a peeled and cored apple into small pieces. Put it in a blender. Add a cup of skimmed milk, a tbsp of honey and a pinch of cinnamon powder. Blend at high speed for 2 minutes, until the apple is completely mashed.
Pour ino a tall glass and drink immediately.
I guess adding protein powder to this one will make it more filling.


No pictures this time. The stuff above wasn't so picture-worthy. It's just slurp worthy.

Wish me luck for my dental appointment. (Luckily you see the typed word. Had you seen the written word, you'd see how I was shivering ;)


Tags-,

BPW- My postcard (Sorry I'm late)

By Our Traveler Guide   Posted at  00:32   Personal No comments

I'll be sending this to....


my BPWmy BPW


Would you believe it if I told you how difficult it is to find picture post-cards in Bombay? Half the shop-keepers didn't understand what it meant, and the others looked at me as if I had gone mad !
One guy asked me if i wanted a 'Picture of a postcard' and the other said, you are the first person who has asked me for this since I've opened my shop. I had almost given up hope when my dad went looking around for this one, he finally got me two cards that depict Bombay's important landmarks.
The other hurdle I faced was due to my own forgetfulness. I was at my mom's place whole of last week ( celebrating Varalakshmi nombu and devouring kozhakattais and vadais ), i had forgotten to carry the cord that connects the cam to the laptop. Hence couldn't post a pic of my card...Boo..hooo

Meeta told me I could post it when i reached my own place. And here's it..I'm sending to A...friend hahaha

It's a picture of Flora Fountain. Completed in 1864, the Flora Fountain was erected by the Agri-Horticultural society of Western India out of a donation by Cursetjee Fardoonjee Parekh. Built in imported Portland stone, but now defaced with white oil paint, it was originally meant to be named after Sir Bartle Frere, then governor of Bombay. However, the name was changed before the fountain was unveiled. It stood in the center of the town as it then was. Now this area is the heart of the business district of the town.


Flora fountain-Then

Flora Fountain-Then

Flora fountain-now

Flora Fountain-Now


This is what Mumbainet has to say about this structure-

"This is the very heart of Mumbai, circumscribed by stately colonial buildings that stand like proud old sentinels of a bygone era. Flora is the Roman Goddess of Flowers, her pretty alabaster face continually assaulted by grime and pollution. Next to her are a pair of torch bearing stone patriots that rise from the Martyrs Memorial nearby. Flora Fountain is now called Hutatma Chowk or Martyr's Square to honour those who died in the tumultuous birth of Maharashtra State. All around the square sit Mumbai's infamous vendors selling just about everything under the blazing tropical sun -- from cheap nylon saris and ballpoint pens to herbal remedies and sexshop gewgaws. Tooting horns and traffic complete the chaotic picture, but through it all Flora manages to retain her serene composure."

Back to top ↑
Connect with Us

What they says

© 2013 Cook Crowd. WP Mythemeshop Converted by Bloggertheme9
Blogger templates. Proudly Powered by Blogger.